
It sounds easy enough right? Why would you need to read a post on how to paint the inside of your house? Surely it can’t be that difficult? Well my friends, that’s what I thought! And to be honest, it’s not a difficult task, but there were a bunch of things I didn’t know until I was knee deep…in paint.
Welcome to the second installment of our renovation diaries, if you missed the first one, you can catch up over here. Like with our first bunch of renovations, we have collaborated with Builders Warehouse again and as usual, our local branch has been such a pleasure to deal with. In fact, instead of going to the large hardware store down the road from us we choose to drive to the next suburb to Builders – their staff are more informed, they have a bigger range of products, and the overall experience is just better.
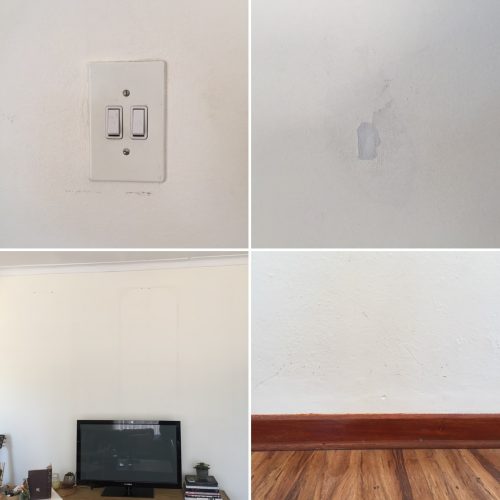
Right, so back to the painting! You all know by now that we bought our home with the intention of giving it a major facelift slowly but surely. After sorting out all of the exterior and boundary walls of the house, we knew that it was time to tackle the interior. Here are some before photos from the lounge. You can see how badly the walls needed to be repainted, you can even see the marks from the previous owners pictures that hung on the wall.
All the walls inside were painted a very yellow-based cream colour which really isn’t to our taste – we (and by “we”, I mean “I”) much prefer cool tones and so we settled on Pale Concrete from the Fired Earth Walls & Ceilings range. This brings me to my first tip:
Swatch paint colours on a wall at home before making a final choice. The swatches online, and even the swatch cards in store are not a 100% true representation of what the colour will look like in your home, especially taking in consideration light and the colour of your floors and skirting boards. If you watch my Instagram Stories, you will know that Dan collected 60 litres of paint, only for me to change my mind. Take my advice of swatching on your wall to avoid all of that extra admin.
We decided that since we were going to be painting all of our walls, we may as well bite the bullet and paint our skirting boards, window sills and door frames as well. The skirting boards were a very red varnished colour and needed to be repainted ASAP and the window sills and door frames were the same cream colour as the walls. We chose a really gorgeous grey colour so that they made a bit of a statement but still tied in with the rest of our home.
So my second tip:
Just do everything at once; walls, doors, skirtings and frames one section at a time. We divided the house in half and tackled the living area first and finished it. Now we are onto the second half which is down the passage and all of the bedrooms. Doing everything at once, one section at a time will actually save you time and will mean that you won’t have to live in a half done room, my actual worst.
Over and above painting all of the extra bits, we also decided to replace all of our plug and light switch casings. Our current ones were really outdated and we wanted to replace them with more modern looking ones. It’s so good that we decided to do this because when Dan took off the original casing to rewire, the wiring was an absolute mess. In fact that house shouldn’t have actually passed electrical compliance. Luckily it was fairly simple to redo and we now have lovely new switch casings. Onto my third tip:
To get the best painting result around your light switches and plug points, remove the casings. You can just use masking tape around them but this often leaves a very thin line of the original colour.
PIN FOR LATER

Now that I’ve covered what we actually did, let’s chat about the whole process, because believe me, when you paint the inside of your house, it’s not a two day ordeal. Over and above the paint and paint brushes, we stocked up on tons of masking tape, but more importantly, drop sheets, something that I didn’t even think off (seriously, I often wonder where I would be without Dan’s logical thinking). Tip four:
Be prepared for your home to become a complete mess with furniture everywhere. We moved everything out of our lounge and entrance into the dining room when we were painting those rooms, and vise versa when we had to paint the study and dining room. There was a lot of chaos, a lot of dust and a lot disorganisation. If you’re like me and like order in your home, just emotionally and mentally prepare yourself for this. This is especially true if you are repainting your bedroom, you will most likely spend a few nights not sleeping in there, especially while you wait for the paint fumes to die.
It took us seven days to do our entry way, lounge, dining room and study. I know, this seems (and is!) a long time, but there are so many other things that have to get done over and above just painting the walls. First of all we had to mask off everything so that paint didn’t go where we didn’t want it to. Then we also needed to sand down the skirting boards, let me tell you, that is not a quick job! And lastly, there were areas where the wall had cracks or actual dips and so we needed to fill those. This filler that we found was so convenient because it didn’t need to be mixed and saved quite a bit of time, plus there was zero waste. And although it may seem like I am complaining a bit (okay, a lot, poor Dan), it’s better to get everything done properly the first time instead of rushing it all and having to live with sub-par work and probably having to redo it all again in a few months.
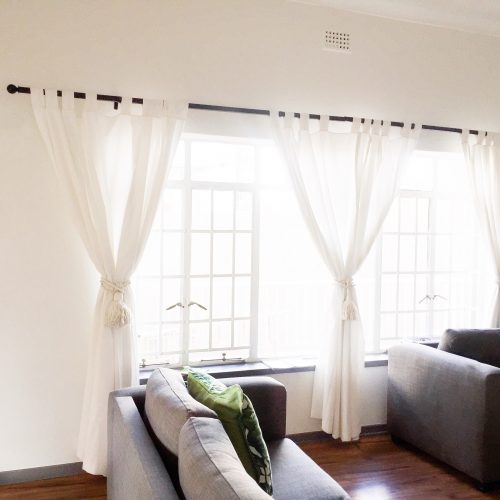
I don’t have huge amounts of after photos just yet – there are still a few DIY’s that I want to finish before I show lots of images, so for now, this image will have to do…
There are some fab little DIY’s coming your way soon though! A rope basket and also a side table upcycle so make sure to keep your eyes peeled, hopefully I get them done soon!


It looks fab friend, well done!
Thank you lovely! Still got a bit more work to do on the rest of the house though
It looks absolutely stunning. What a huge difference just a coat of paint can make to the room. And I really love the grey skirting.
It’s crazy how much of a difference it makes, I am so much happier without the yellow toned walls 🙂
It looks gorgeous! I’m sure Aria also helped out. 😉
Obvs, she went for the wiring with a screwdriver…eeeek!