
Ooooh have I been waiting for this! Our bedroom makeover has been a long time coming but like most parents, we did the girls rooms (and a whack of other things) first. But finally it’s our turn, yay!
Because there are quite a few things to get done and the fact that money doesn’t grow on trees, we are doing our room in phases as we can. I asked on my Instagram stories a while ago if you’d like me to show you things step by step or all at once and 90% of you wanted to see the slow progress, so here we are!
Here is what our room looked like before (please excuse the state of the room, we were packing it up before we began with the painting):


When we moved into the house 4 odd years ago it there were really grotty carpets in our room so we ripped those out and have been living with these untreated wooden floors… but that’s for phase two.
I think the best way for me to talk you through phase one is to chat about each issue we had individually and show you what we did, so here we go…
The paint: Our bedroom was the one part of the house that we didn’t repaint because we knew we were going to get around to revamping it at some stage. The colour on the wall was a very yellow cream which is not our style at all. We wanted one statement wall in a dark navy colour, and the rest of the walls a very stark white. I love how the walls came out and so many of you have asked what paint we used. We used Fired Earth (available from Builders Warehouse), the statement wall colour is called Boys Blazer and the white wall’s colour is called Eider. Just the fresh coat of paint alone made such a massive difference to the ambiance and light in the room… but there was a lot more to do!

The curtains: The top half of our curtains were in great nick considering that they are about 15 years old but oh my, the bottoms were a disaster, they were too long for our windows so the bottom of them had become dirty and raggedy. Not only that but our dogs rubbed against them when they went to sleep at night and so they got even dirtier! We decided that the best option was to go for a roman blind. We didn’t want anything fancy and just in plain white. We had someone local make it for us and it looks so great! Simple, neat and the dogs can’t wreck it, hooray!

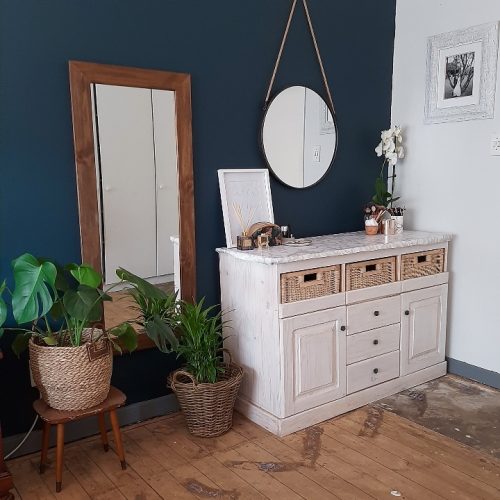
My dresser: This was actually Aria’s old compactum but with my ever growing skincare and make up collection, it made the perfect dresser for me once Aria didn’t need it anymore. Even though it was still in perfect working order, it did need a bit of a spruce up. I filmed the whole thing for my IGTV which you can watch over here.

Dog bed: I know, this is so random but it was something that was really bothering us! Our pooches sleep in our room on a dog bed. The problem that we found with this is that:
1. It just looked untidy
2. The area where the bed is isn’t huge and the circular bed was taking up too much space
3. The dogs were rubbing up against the wall where they slept and making it dirty
We searched Pinterest (of course) and finally found a design we liked. Having a triangular bed in the corner is a much better use of the space and it definitely looks so much neater. Dan build it all from a piece of wood and some palettes and I’m thrilled with how it came out! He put some paneling (we just need to add one more layer) on the wall so that if the dogs do rub against it (the boards are sanded so they won’t get splinters), you won’t be able to see the grubby marks that they leave behind. All that I need to do now is get a piece of foam cut to size for them and cover it. Let me know in the comments if you’d like a full tutorial on how to do this.

Decor: There wasn’t a huge amount of decor that I wanted to add to our room, I didn’t want it to look too busy. We added this mirror from Mr Price Home as I wanted a decent full length mirror and we also hung up my circular mirror from Coricraft that used to just rest on my dresser. Of course I added some plant babies because I’m obsessed, and I styled my dresser differently so that it didn’t look too busy, don’t you love my boobie print from Sugar and Vice? We are still undecided about whether we want to put anything above our bed or not. I’m leaning towards no, simply because the wall already has quite a lot on it. What do you think?
And that’s phase one done! I’m so thrilled at how all of the different elements have come together, the navy statement wall and the pops of natural fibres (the pallette dog bed, wooden mirror, wooden floor, rope on the mirror) just add such lovely texture and interest to the room. What was your favourite transformation? I love them all, I truly can’t decide.
So, what’s left to do?
1. The floors: they’re completely untreated so we need to sand, stain and seal them. There is also a section of concrete before the bathroom that we need to figure out.
2. The TV cord: it drives me nuts but we’ve come up with quite a cool little plan to hide it… hopefully it works!
3. A new mattress: my back can’t take our current one anymore, it’s time for an upgrade!
Stay tuned for phase two… fingers crossed that we can do it this year still!
*Disclaimer: The paint for the walls was sponsored by Builders Warehouse on a trade exchange basis.


Absolutely stunning!! Love your ideas and think I am going to use a few for our room ? Thanks for sharing! xxx